
Product Quality Assurance
Setup Product Requirements
Product Requirements are used to define the characteristics and substances for the product along with their limits. It is used in Certificate requests to allow the supplier to enter results for each of the required characteristics and substances.
Define Product Requirements
Open a Product to define its requirements.
Go to the Mechanical properties tab.
Click Add Standard to link already existing standards from your class or material standard registry
Click Add group to create a new characteristics group for this product.
Add a name for the new group by clicking on the three dots and click "Change name".Add characteristics relevant for the custom group.
Enable / Disable "allow linking results from Bill of Material" checkbox on each standard group
Enabling "allow linking results from Bill of Material". This is used to transfer results to lots it is a part of.
Click Save / Save and Back
Manage Class and Material standards
Class standards and Material standards are a group of requirements that can be linked to products. They can be either Global (defined by ChainTraced) or you can create your own standards for requirements that are shared by several products.
If you update a standard, you will be asked is you want to update all products that use this standard.
Class standards categorise steel products based on their intended applications and define key properties such as:
Mechanical properties (e.g., tensile strength, hardness).
Performance criteria (e.g., corrosion resistance, heat tolerance).
Certification requirements (e.g., compliance with ASTM, EN, or ISO standards).
Application-specific criteria (e.g., structural, automotive, or tool steel).
Material standards typically list the chemical composition of the material.
Create a new standard
You can create your own class or material standards to be linked to your products.
Go to Class or Material standards in the main menu, and click "Create new class/material standard"
Enter a name and description for the standard
Click Add Characteristic or Add Substance button
Within the popup, pick characteristic or substances from the list. You can also create your own custom characteristic if not available in the defined list.
Select Type of characteristic
You can select from following Types of characteristics
Min/Max: refers to measurable attributes that are defined by minimum and maximum limits.
Conform: Result is input as either Pass or Fail.
Checkbox: Provides a checkbox that can be ticked to indicate compliance.
Specification: Result field is a free text field. A specification characteristic can have the result field pre-filled in the product specification.
Enter Unit if applicable
Enable/ Disable Define on product (template)
If Enabled you can define the limits on the product instead of in the standard. This is used when the limits are unique for each product.
Enable / Disable Optional. This means that the result for the characteristic is optional.
Click Add
Click Save button / Save and back button.
Configure the Bill of Material
If a BoM is added to the product, you can configure how data from the BoM products should behave in a manufacturing lot as default. This can be changed on an individual lot.
Append Attachments: all attachments that are set to Available from the incoming lot will be attached to the outgoing lot as is, when sending to Customer.
Append Characteristics/Append Charge: all the characteristics/charges and their test results, will be appended as is, from the incoming onto the outgoing lot when sending to Customer.
Under the “Characteristics” and “Material” headings, you can choose to “Allow linking results from the Bill of Material”. This will pick the results from the BoM Lots that match the characteristics on the Product being manufactured and fill as results on the manufactured product
The difference between Append Characteristics and Link results is that appended characteristics will be declared separately on a certificate with BoM product specified.
A linked result will be inserted on the matching characteristic on the manufactured products.
Typically, you might want to link the chemical composition of the raw material to a machined product rather than declaring the raw material´s product number separately.
For an assembled product or a kit, you probably want to Append the data for the BoM products to declare them separately in a list.
Lot Approval
Collect Lot Approval
Manufacturing Lots
This section will go through how to create a Manufacturing Lot with a Bill of Material (BOM) and without a BOM.
NOTES:
When Manufacturing Lot is in Status Ready, it will be able to be sent to Customer through the “Outbound”. In Draft, it will only be available under Manufacturing Lots.
“Unlock to edit” at the bottom of your screen makes it possible to edit an existing Manufacturing Lot.
Go to “Manufacturing Lots” under Production (main menu) and click New Lot.
Choose the Product Number (*) and then fill necessary information.
Change the status if needed
Draft When Lot is set to Draft, the lot cannot be linked to your Outbound certificates.
Ready When Lot is set to Ready status, the lot will be available to be linked to your Outbound certificates.
If relevant, under Bill of Material click the “+Add item” button to choose your BOM Products. Skip this step if BOM products are in place (see section 6.2.1 on creating a BOM in Product).
Click the “Add lot” and choose the Incoming Lot to use.
Click “Append Options” on each product to make sure the desired settings are in place (company default is set under company settings, see 3.6).
a. Append Attachments: all attachments from the incoming lot will be attached onto the outgoing lot as is, when sending to Customer.
b. Append Characteristics/Append Charge: all the characteristics/charges and their test results, will be attached as is, from the incoming onto the outgoing lot when sending to Customer.
Under Characteristics Data/Material Charge, fill out the appropriate data and “Link Results” if necessary. Link Results: Picks the results from your BOM lot(s) that match the requirements on the Product being m
Make sure to “Save”.
Without BOM
Go to “Manufacturing Lots” under Production in the main menu to the left. Click “+ New lot”.
Choose the Product Number (*) and then fill out all the necessary and obligatory data.
Make sure to “Save”.
Create and Submit Lot Approval
To send a Lot Approval (LA) to a customer, you can either create a new LA or respond to a Request created by a customer. If you are responding to an existing Request, Open the request and go directly to Add a Manufacturing Lot number
Navigate to Lot Approval Outbound from the main menu
Click Create new lot approval to create an Outbound Lot approval.
Enter mandatory information, for creating the certificate
Select Product
Select customer
Select Certificate Type.
User can enter more relevant information to further define the Outbound
certificate such as Customer Product Information, Customer Order details, Delivery Date and Expiry Date and Notes.
Click on Next Step, to continue.
Add a Manufacturing Lot number
You can select an existing Lot number for the product if available. This is useful if you have a certificate from a supplier in Inbound that you want to distribute to a customer. You can also select an existing Manufacturing Lot that you previously have created in the Manfacturing module. No information about the supplier will be made available to the customer.
You can also create a new Manufacturing Lot. A Lot number is mandatory.
Scroll down and open the drop-down field to select an existing lot or click "Add Manufacturing lot " to create a new lot.
Depending on how the product is set up, you can now enter more information. Click Create when all data is filled in.
You can add attachments as necessary. Click Submit when you are ready to send the LA to the customer.
Part Approval
Collect Part Approval
To create a Part Approval Reqeust to a supplier, go to Part Approvals - Inbound and click Create new part approval.
Select Product and Supplier and Part Approval type
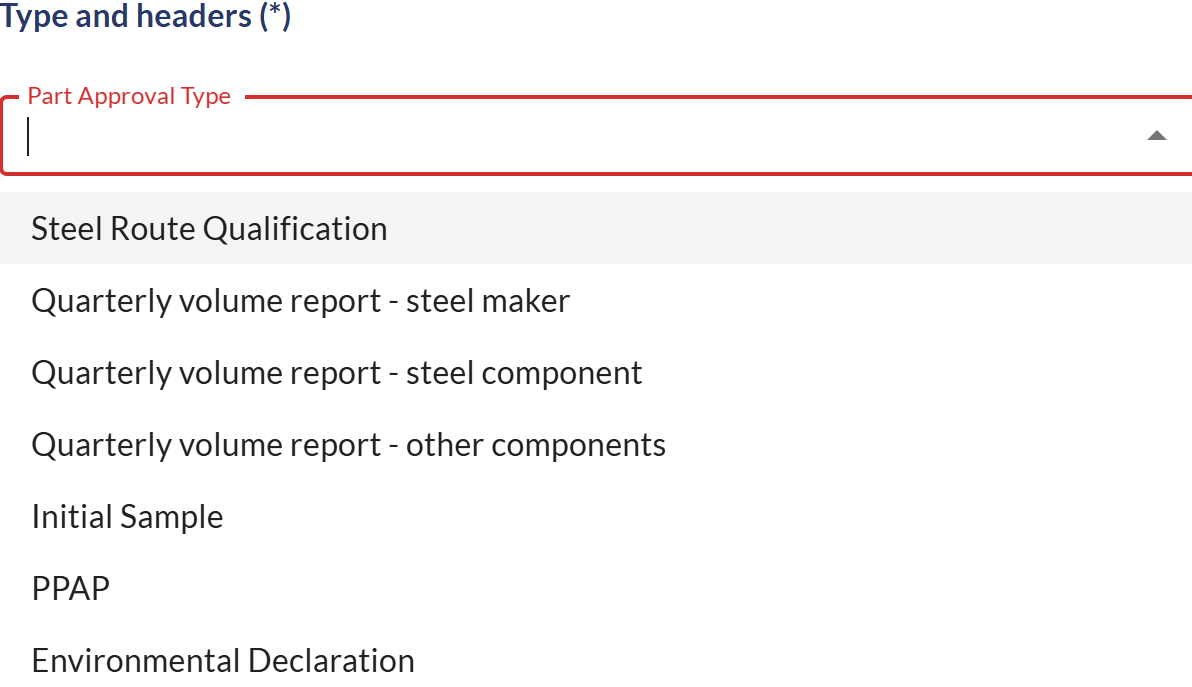
Steel Rouse Qualification and Quarterly volume reports are customer specific types and are not described here.
Initial Sample is the type for Part Approval
PPAP will be discontinued
Environmental Declation is used to collect Product Carbon Footprint data.
Fill in any other data needed in the provided fields and click Request from supplier to make the request available to the supplier and send a notification email if enabled in company settings.
Generate and Submit Part Approval
To send a Part Approval (PA) to a customer, you can either create a new PA or respond to a Request created by a customer. If you are responding to an existing Request, Open the request and go directly to Add a Reference number
Navigate to Part Approval Outbound from the main menu
Click Create new part approval to create an Outbound part approval.
Enter mandatory information, for creating the certificate
Select Product
Select customer
Select Part Approval Type. This should be Initial Sample for a Part Approval.
User can enter more relevant information to further define the Outbound
certificate such as Customer Product Information, Customer Order details, Delivery Date and Expiry Date and Notes.
Click on Next Step.
Add a Reference number
You can select an existing Reference number for the product if available. This is useful if you have a record with attachments from a supplier in Inbound that you need to pass on to a customer for their approval. No information about the supplier will be made available to the customer.
You can also create a new reference number. A reference number is mandatory.
Scroll down and open the drop-down field to select an existing reference or click "Add Reference number" to create a new reference.
Depending on how the product is set up, you can now enter more information. Click Create when all data is filled in.
You can add attachments as necessary. Click Submit when you are ready to send the PA to the customer.