
Introduction
ChainTraced PCF management is designed to collect emission data for your purchased products from suppliers, add you own (core) emissions and provide the result to your customers or the market.
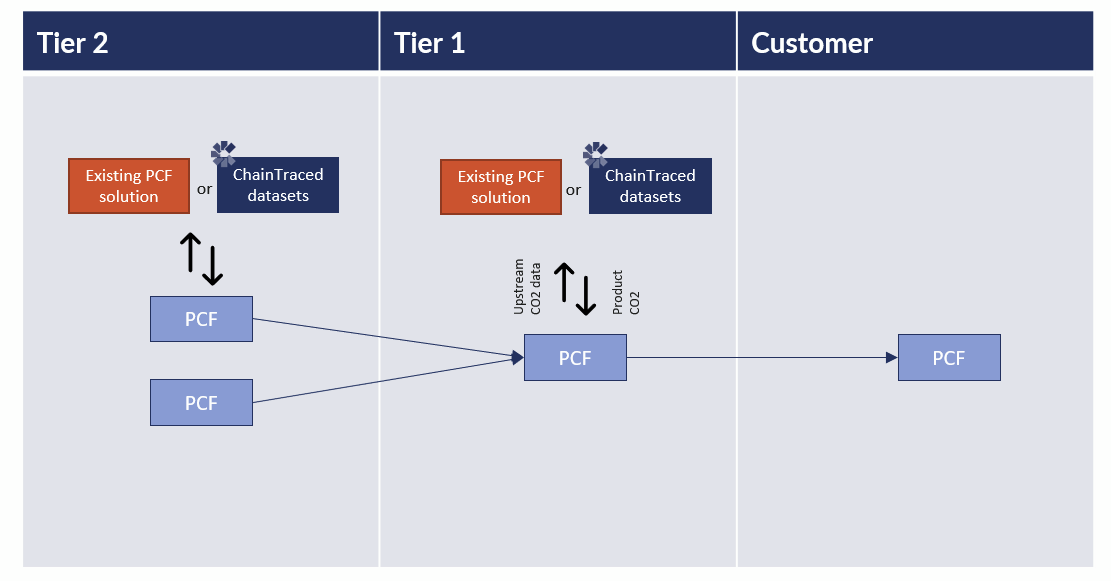
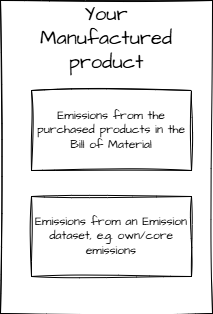
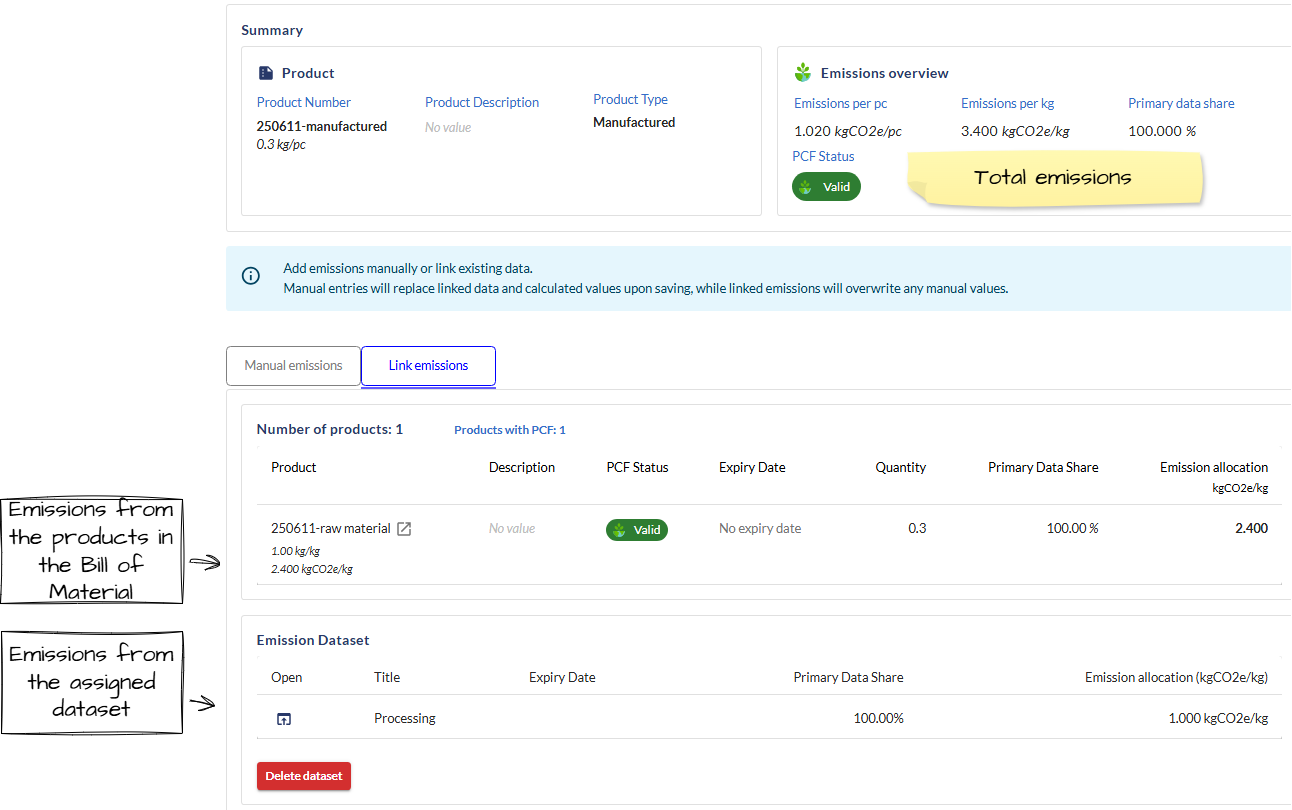
The aggregation of emissions from purchased products to your manufactured products in done via a Bill of Material with the raw material or components that your manufactured products are made from.
Click the images for a larger view.
You can see how the emissions are built up on the Emission data tab for the product.

Setup Emissions for Purchased Products
You can collect PCF data from your suppliers for your purchased products by creating a request to each supplier. The PCF for a purchased product is assign to a manufactured product through a Bill of Material as Upstream emissions.
Do only follow these steps if you shall collect upstream emissions from your suppliers in ChainTraced via requests. If you intend to add emissions yourself, you should create a dataset for upstream emissions and assign the dataset to the purchased products.
To start requesting PCF data from your supplier, please ensure that you have setup the following
-
The supplier counterparty is created. See Counterparty Management
-
The purchased product is created and at least one supplier is assign to the product. See Product Management
Collect PCF from Suppliers
-
Go to Products in the side menu
You can filter on "Product Type: Purchased" to filter out purchased products. -
Open the product for which you want to collect PCF.
If you plan to request PCF for several products, you can use Carousel mode to go from one product to the next and request PCF one by one.
See Navigation
-
Scroll down to the Product Suppliers section.
-
Select the supplier(s) for which you want to request data
-
Click Request missing PCF to generate a request to the supplier.
The platform will provide you a confirmation message stating that the PCF is requested.

This will create a Part Approval request of the type Environmental Declaration to the supplier. The request is visible in Part Approval - Inbound.
Review and Approve PCF reports from suppliers
When a supplier responds to your request, the record will switch status to Needs your Approval. When you have approved the PCF report, the emissions reported will be assigned to the purchased product and all products that the purchased product is a part of in a Bill of Material.
Information on Statuses
All PCF that are created that follow a status workflow. Representative definition of statuses is as follows
-
Requested : When a new PCF request is created towards supplier , it is created in Requested status.
-
Needs your Approval : When supplier submits the PCF with emission data , the status changes to Needs your Approval which requires you to review and Approve the PCF
-
Requested Changes : You as a a customer , after receiving the PCF, can request changes on the PCF document which will be sent back to supplier and status will be updated on your end as Requested Changes.
-
Approved : The PCF received from supplier can then be Approved if it as per requirement.
-
Reject : The PCF received from supplier can be rejected if it is not as per requirement.
-
Withdrawn : When PCF is withdrawn by you as a user , this pcf is updated with status Withdrawn.
Review and Approve PCF
All PCF requests that have been created to suppliers are available in Part Approval Inbound in the main menu. You can create new PCF requests and edit/delete existing PCF requests from here.
-
Go to Inbound from the main menu
-
Select and Open the response you wish to review. The response will have status "Needs your approval".
-
Scroll down to the Emission data section and review the data.
Click Additional information to see more details if available.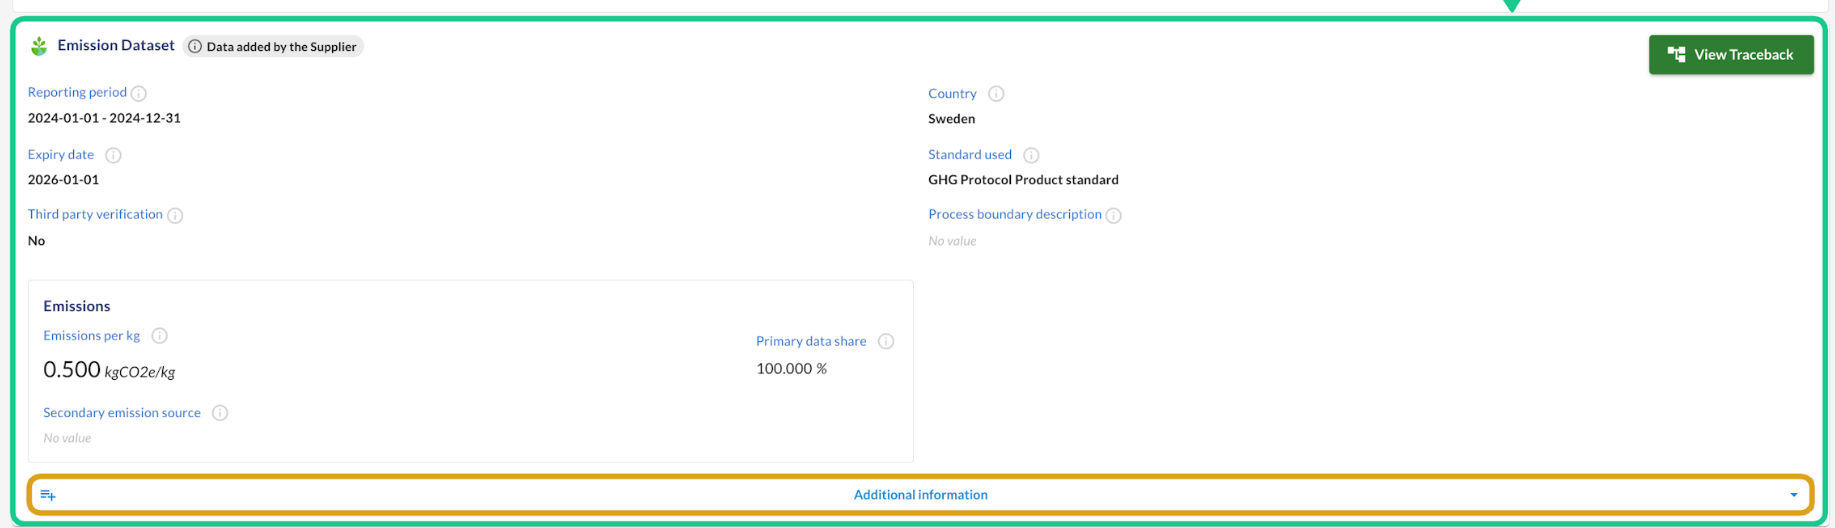
-
If the data looks good, click Approve or Approve with comments to approve the response and update the purchased product and all products where it is a part of the Bill of Material.
There are also options to Reject the data or Request Changes.
Approve with comments allows to write a comment to the supplier.
Setup Manufactured Products
Manufactured products are products that can have a Bill of Material with all the raw material or components that the products are made or assembled from. If it is a machined, solid product the BoM normally only has one product in it, such as a bar, wire, sheet metal etc.
The emissions from your own operations are assigned to the manufactured products with an Emission dataset. The emission dataset can contain only the total emissions and validity dates or it can contain the full calculation with all the emission sources.
Setup and Assign Emission Datasets
Emission datasets are utilized to declare emissions. Datasets are available under Emission datasets in the menu. There, you can create new datasets, edit, duplicate and delete existing emission datasets.
Datasets can be assigned to products to allocate the declared emissions to the products. Any update of the datasets will update the products which it is assigned to. A dataset can represent e.g. your average company emissions, emissions for product category or a manufacturing route.
Create an Emission Dataset
Datasets are available under Emission datasets (1) in the menu. There, you can create new datasets, edit and delete existing emission datasets.
-
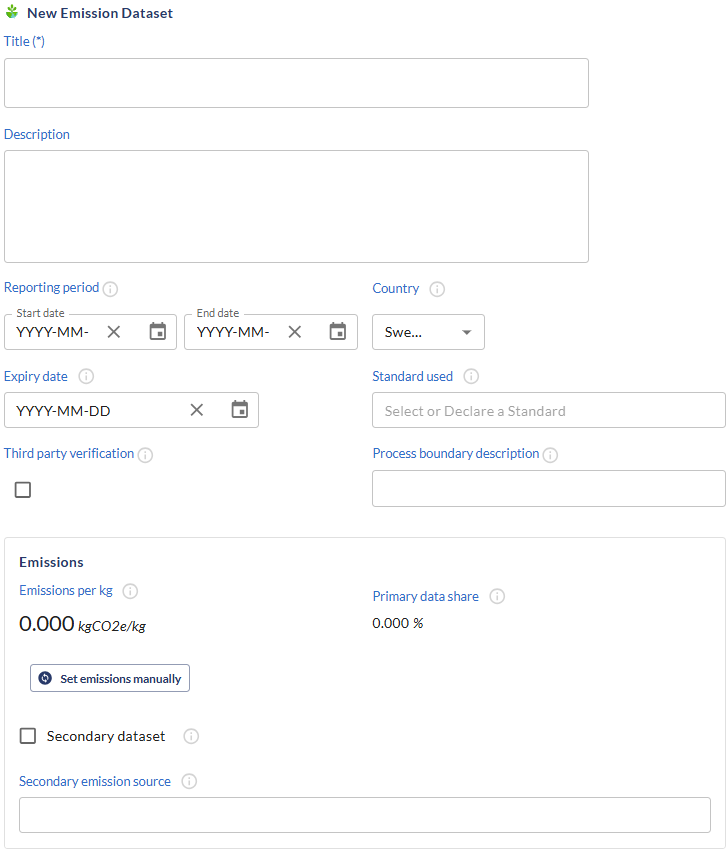
To create a dataset, click Create new emission dataset.
-
Give the dataset a title and description.
-
Set the reporting period's start and end dates. This to define what timeframe the data represents, along with an expiry date for data validity and renewal.
-
Verify and, if necessary, modify the country to reflect the data's representative region.
-
Choose or specify the standard used for data calculation.
Standard used field is also a free text field where user can add own text if not available in dropdown.
-
Detail the boundaries and cut off rule under process boundary description.
-
Confirm any third-party verification by ticking the checkbox and detail the verifying body in the boundary description.
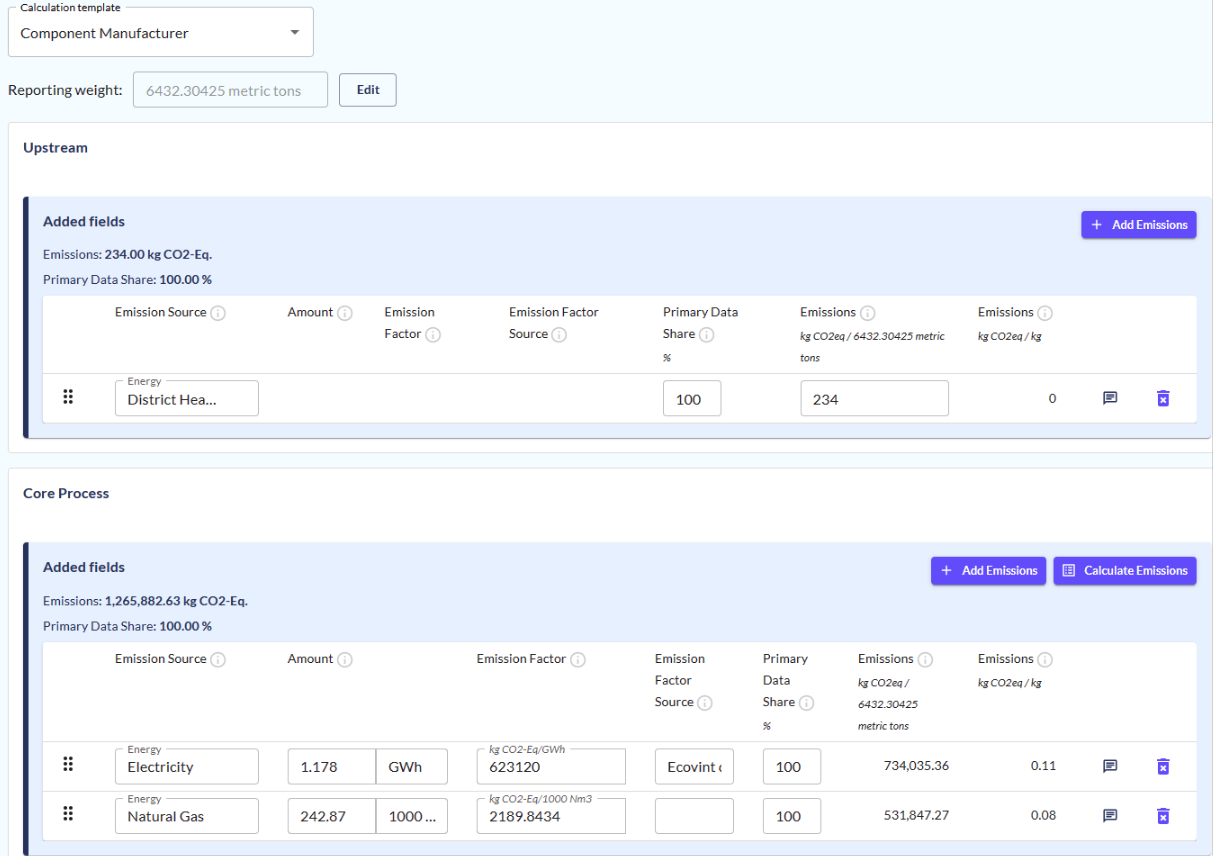
Add a Calculation
The emissions are declared in the Calculator section
There are 3 templates available for declaration in ChainTraced.
-
"Default" is a basic template where emissions can be declared without declaring consumption and emission factor. All declaration are made in kgCO2/kg product.
-
"Component manufacturer" template allows declaration of consumption and emission factor.
-
"Steel Maker" template is used by Steel manufacturing industries when you want to declare a breakdown of Cradle to Crude steel and Crude steel to Gate emissions.
-
Under Calculation, select appropriate template
-
Click on "Edit" button visible to change the total reporting weight for which emissions are calculated, e.g. a full year’s production.
-
Click "Add or Calculate emissions" button for upstream and/or core emissions section to add emission sources and data.
-
Add emissions will allow you to add only Total emission value.
-
Calculate emission will allow you to declare Amount used, unit and Emission Factor while emissions for the energy source will be auto calculated.
-
-
Electricity use can be declared in the table below the calculation.
-
Click "Save" button to save the dataset and stay on the page or "Save and Back" button to go back to your Environmental dataset list
Assign a Dataset to a product
-
Go to Products in the main menu.
-
Find and open the product you want to link.
-
Go to the Emission data tab.
-
Open the tab Emission Datasets and click Add dataset.
-
Click on "Select a dataset" and choose the dataset you wish to add to the product.
-
After adding a dataset click save.
-
Your updated emission data is now visible in Emission Overview.

Bulk Assign a Dataset to products
If you want to assign one dataset to several products in bulk, use this instruction.
-
Go to Products in the main menu.
-
Use filters to list the products that you want to assign a dataset to. E.g. Manufactured products.
-
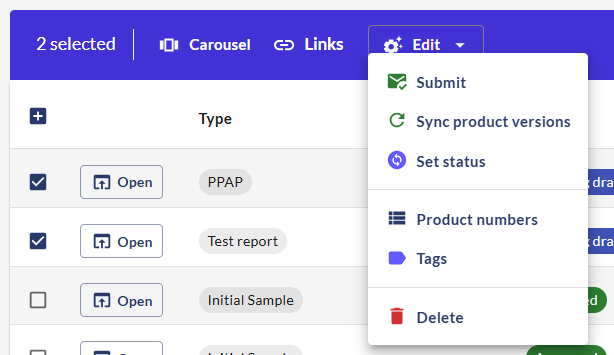
Click select all checkbox to assign your dataset to all your manufactured products in the list, or select products individually.
Note that you can only assign dataset to selected products visible in your front page of the list . Change the page limit to 100 to assign the dataset to 100 products in 1 go.
-
Click on the Assign Dataset button icon in the Edit menu that appears after selecting products.
-
Choose one dataset you want to link to the chosen products
-
Once dataset is assigned, the Assign dataset to products button will be clickable.
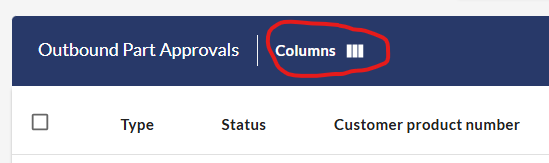
Datasets assigned can be viewed within your product registry under column "Assigned Datasets". If the column isn't visible, enable the column by clicking the Columns icon above the product list.
Review the product emissions
Once the purchased product in the Bill of Material has its emission request approved and the manufactured product has a dataset assigned, you can review the result in the Product´s Emission data tab.
Report PCF to Customer
When the manufactured products are set up with emissions from the Bill of Material and a dataset, it can be linked to a request (if not linked already) and submitted to the customer.
-
Go to Part Approval / Outbound in the left menu to find your requests.
-
Select the request that you want to work with and click open on the request.
-
Scroll down to the Product section. If your product number is not shown under Product, click the dropdown "Pick a product" and select the product number that corresponds to the Customer Product number and click the Link button.
-
If the products are already linked (no dropdown visible), continue to 4. or click Change Product if you want to link to another product.
-
-
Review the emission data by clicking Additional Information
-
You can add attachments if you want to.
-
Submit the PCF report to Customer.
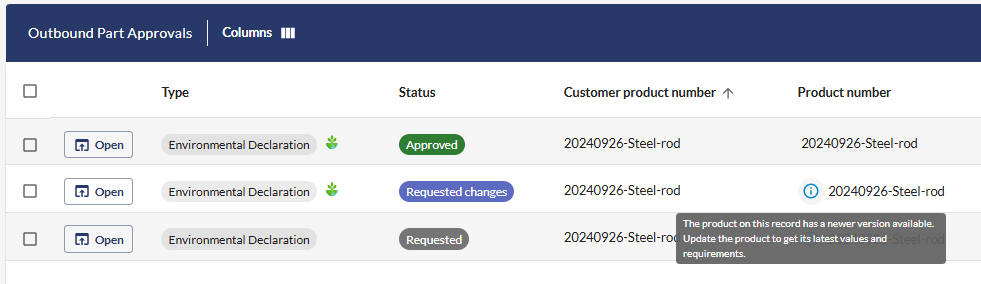
Watch out for a blue Info icon in the product list. That means that the Product data has been changed after it was linked to the request. The request must be updated before it is submitted.
You can open the request to update the product or update all out-of-date requests by selecting them and use the edit menu.
Bulk Update and Submit requests
If you have many requests, there are bulk features to both update and submit requests in bulk. Follow these instructions to do so.
-
Select the Emission columns in the view if not done already.
-
Choose to view 100 rows per page to manage 100 requests in each bulk action.
-
If you have products out-of-sync, highlighted by the blue info icon mentioned above, select all products, click the Edit menu and select Sync product versions.
-
When all products are synced, select all products, click the Edit menu and select Submit.
-
Repeat this for each page if you have more than 100 requests.
📋 Related articles